Sunday, June 22, 2008

Safety first: Controlling your power tools (so they don’t control you)


When using power tools in your yard, you have to take precautions to protect yourself from harm:
  • Wear appropriate clothing (long sleeves, long pants, and steel-capped boots), eye protection, and perhaps ear protection as well.
  • Always read the manual so you understand how the machine operates.
  • Make sure you know how to turn it off.
  • Make adjustments only when the tool is off.
  • Some tools become hot as you use them — be careful to avoid burns.
Obviously, when a tool is not in use, it should be safely stowed indoors, out of the path of foot traffic; make sure you have it secured, in its off position, and sheathed or covered if it has sharp parts. Here are some more safety tips:
  • For gas-powered tools: Double-check that there are no leaks (sniff!). Store extra fuel in containers intended for that purpose; then label these containers and keep them out of the way in a cool, dry spot.
  • For electric-powered tools: Always use a circuit breaker; check the cord often for signs of wear or damage to the insulation or connectors. If you need an extension cord to run the tool out to the project spot, get one of those bright-orange ones so the cord is readily visible to you and others.
  • For tools in general: Service the tool annually (at season’s end is best; surely by early spring). If you don’t know how to or don’t want to, hiring someone else to do it isn’t expensive. Wipe or scrub the entire exterior clean and drain all fuel at the season’s end. Sharpen dull edges and replace worn parts.

Moving up to pruning saws


The pruning saw is such a simple tool that people tend to underestimate it.
The first thing you need to know about pruning saws is accept no substitutes. Don’t use any household or carpenter’s saw in its place. Those tools aren’t curved — a feature of the pruning saw you can immediately appreciate when you use it. Plus the blade may be too thick, which chews up the branch instead of severing it, or the cutting teeth may not be right for the branch you want to cut. Invest in the saw that’s meant for gardening! It’s never expensive, and you won’t be sorry.
Use a pruning saw on branches that won’t yield easily to loppers — basically, anything over 3 inches or so. You can manage thicker branches using the standard three-way If the job seems too big for your pruning saw — if you feel the slightest overmatched or in danger — hire someone else to do the job or use a chainsaw instead End to end, a typical pruning saw is between 14 and 20 inches long. Some shorter folding ones are handy for smaller jobs and are easy to carry in your pocket. The handle is traditionally of pistol grip design so you can hold and wield it securely and safely; it’s usually wood, but it may be tough plastic. As for the blade, seek something that’s rust-resistant and strong, such as tempered steel alloy. Look closely at the teeth — you want the tri-edge blades (the ones with three bevels), because this shape makes for the fastest, neatest cuts. Plain lance-toothed pruning saws are still around and are admittedly cheaper, but the cutting can be rough going.
What’s the advantage of a folding saw? It’s simply a safety feature, eliminating the need for a scabbard of some kind for carrying or storing the saw when it’s not in use. Beware of cheap folding saws, though! A well-designed folding saw locks securely in both the open and closed positions. The bow saw, which is a D-shaped saw, is bigger and more formidable, up to 3 feet long, intended only for bigger pruning jobs on larger branches. It allows both a push and pull cut. The frame should be of rigid steel so the blade is kept taut (or you can tighten it before each use).

Branching out with loppers


A lopper is a sort of in-between cutting tool. By that, I mean loppers are what you reach for when the branch is too thick for hand pruners yet too leggy to be managed with a saw. In these cases, which come up more often than you may think, there’s no better tool for the job than a lopper. A good pair of loppers has long, strong shafts of steel, fiberglass, or hardwood. At the ends, where you grip them, you want either vinyl or rubber handles, just to alleviate vibrations from cutting and make the work more comfortable.

At the top, the curved hook and blade ought to be tough metal such as forged carbon steel — sharp, of course, and beveled. The point where these two elements come together needs to be strong and secure; look for strong, stout pins or rivets, as well as rubber bumpers. Use loppers on wayward vines, on overgrown shrubs and hedges, and on small ornamental or fruit trees. You may find loppers especially handy if you have to reach into the greenery or work in tight quarters. Employ a pair of loppers when you need to cut something 2 inches in diameter or less. Some of the special ratcheted types can tackle somewhat larger material.

Hedging your bets on hedge shears


The basic design of hedge shears has changed a little over the years to become even more efficient than ever before. Basically, you’re looking at a tool that’s from 1 to 2 feet long from tip to handle’s end (unless you get an especially long-handled model). This form allows the average-size person to slice away while standing comfortably. These cutters are meant to be used to trim hedges, whether evergreen or deciduous. They’re too big and unwieldy for spot-cutting jobs or regular pruning.
The shafts are either light but tough tubular steel or heavier hardwood, usually with cushioned grips to make your work more comfortable and your grip more secure. The cutting blades are long and sharp, the cutting edge is ideally beveled, and the base (near the fulcrum) may have serrations for those occasions when you encounter especially tough branches. You can get better results and longer use if the blades are tough, drop-forged carbon steel. Check also that the point where the cutting blades meet the handles is secure and tough.
The blades of hedge shears vary. Wavy-edged ones help keep branches in place as you work without gathering dirt or roughening the cut. Serratededged ones can tame unruly stems of wayward shrubs by holding them while you cut.
Assuming you can run a cord from a power source out to your hedge or other shrubs that need occasional shearing, electric hedge pruners are worth considering. They can often do a neater and faster job, which may be important to you if you have a lot of hedge to cut or are striving for a formal, tidy look.

Getting a handle on hand pruners


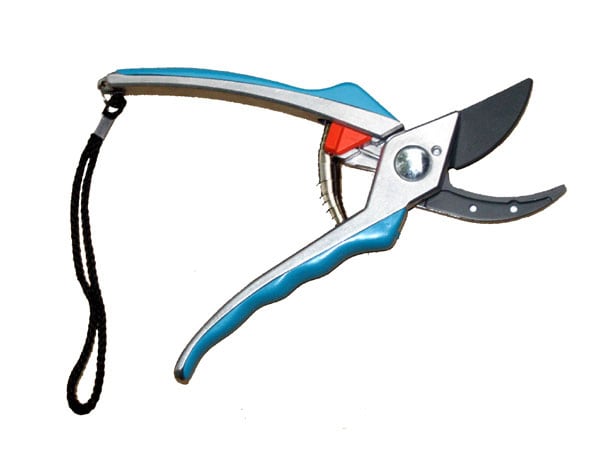
Hand pruners: You should know that many serious gardeners value these handheld cutters above all else — they carry these gadgets everywhere (in a special belt holster or tucked in their back pocket) and are reluctant to lend them. Why? A good pair fits your hand comfortably and takes care of a wide range of gardening jobs, from snipping off the spent stems from last year’s perennials to cutting roses for a vase to cutting away a pesky sucker to trimming a favorite shrub or ornamental tree. In a word, pruners are handy! You may see hand pruners called secateurs, especially in English publications. In general, hand pruners are intended for use on anything 1⁄2 to 3⁄4 of an inch in diameter (depending on the type) — which covers a lot of gardening cutting jobs, actually. If a branch is thicker, your pruners and your hands will strain and the pruners won’t be able to do a good job.
The best pruner handles are designed to absorb shock but are still lightweight and strong. Usually, they’re made of aluminum alloy and coated with a smooth, durable vinyl (usually red!). The more-expensive hand pruners come in leftand right-handed models.
As for the blades, you want tempered carbon steel. It’ll start off sharp and need to be resharpened by you or someone else (which is never expensive) from time to time to maintain the bevel, but it’ll hold up well and last a long time. You usually use a whetstone for sharpening, though you may be able to find gadgets made for sharpening pruners that can make the job much easier. Sometimes just replacing nicked up blades is easier. Better hand pruners have replacement cutting blades you can purchase. Here are some other considerations when you’re looking for a good hand pruner:
  • If you’re investing in a good, professional-grade pruner, you may one day want to replace the blades rather than the entire tool, so discern now whether that’ll be possible.
  • A safety latch is very important so the clippers don’t spring open when you don’t want them to, such as when they’re not in use or when they’re lodged in your pocket. A good pruner should click in and out of position easily, ideally with a flick of your thumb.
  • The spring that holds the pivot, keeping it tense, should operate smoothly, without catching, without hesitation. Try it out a few times to make sure.
  • Some clippers have a nice feature on the bottom blade, a groove that helps carry sap and pitch away from the tool. You should be in the habit of cleaning your pruners after every use anyway, but this little extra certainly helps.
Though you may feel like dozens of different kinds of hand pruners line the store shelves, the tools are really all variations on two themes — bypass pruners and anvil pruners. Both types are approximately the same size but operate differently:
  • Bypass pruners: By far the most common, these pruners make neat, even, have-close slices, thanks to a beveled cutting blade.
  • Anvil-style pruners: These pruners earn their name because the cutting blade comes down on a slender, non-cutting “anvil” blade, so a flush cut isn’t possible. This tool is right for cutting very tough or dead wood. Some anvil-style pruners have a ratcheting action, which makes cutting easier.

Saturday, June 7, 2008

Making the Right Cut with Cutting Tools


So many great cutting tools are available for gardeners! This area has seen remarkable innovation in recent years, making everything from harvesting flowers and fruit to major pruning jobs neater and more efficient than ever before. Treat yourself to some good cutting tools — they make life (and plant, tree, and shrub maintenance) so much easier.
Keep ’em clean. As with digging tools, or any garden tool at all for that matter, cutting tools get dirty with use. If you’re good about cleaning them after each use or at least when grit, sap, or pitch builds up on their blades, they’ll serve you much better and for much longer.

Putting an oscillating hoe to use


An oscillating hoe (also known as an action hoe, hula hoe, or stirrup hoe) looks different from the average hoe. Rather than a solid piece of sharp metal, it’s a shallow open box (like a cookie cutter) of double-edged blades, and it moves about 1⁄2 inch back and forth as you push or pull it. Thus, it can cut in two directions and is also self-cleaning (debris slips off with each backand-forth motion). It’s especially effective for combating established weeds in heavy soil. This sort of hoe is amazingly easy and fun, almost relaxing or hypnotic to use. The stirrups may be as big as 7 inches across or as small as 2 inches across.

Weeding out poor weeders to get to the best


Unlike the hoe, or a layer of smothering mulch or black plastic, a weeder is a hand tool, a clever handheld weapon in the war on weeds. You can usually take out the invading marauders one at a time. As such, using a weeder is better than attacking the enemy with your bare hands. You can use the same vigor — or frothing rage, if it comes to that! — but a weeding tool makes your efforts more productive. A good weeder helps you extract the entire plant (as you know from dandelions and other weeds, leaving a bit of root behind usually means that the war isn’t over yet).

Just take a look at the many options — try out something — or make an effort to match the weeder to the weed, because some tools are specialists. You need a forked end, for example, to get plants with taproots, and the “mini-hoe” action of a typical hand weeder works better on shallow-rooted and well-hidden weeds where your aim is merely to slice off the aboveground parts of the plants. Personally, I don’t find weeders with rotary blades to be very useful.

Because weeders go into the difficult zones of tough soil and tenacious root systems and may contend with daunting obstructions, including rocks and other impediments, they need to be both very tough and somewhat flexible or resilient. Steel is best, of course, though not all steel is created equal. Sturdy gauge steel is fine, and stamped steel is adequate, but if you want a truly powerful and long-lasting weapon, spend your money on a higherquality forged steel weeder.

Most weeders are meant to be used down on the ground, as close to their quarry as possible. This means you have to sit, kneel, or squat, which reduces strain on your back and allows you to bring maximum force to the job at hand. If the ground is damp or uncomfortable for you, do your weeding perched on a mat or kneeling on one of those nifty low gardening stools. Take out weeds earlier rather than later, because smaller weeds are always easier to attack. Work when the ground is damp from a rain or recent watering, and you should find the job much easier.

Ho, ho, hoes


All sorts of hoes are available, and the one or ones you choose to invest in is partly a matter of what you feel comfortable using and what you need them for. For maximum efficiency, both pushing and pulling action is desirable.

At any rate, hoes tend to be long-handled, which is fine, but their blade also needs to be right for the place where you use it. If you’ll be working in cramped spaces, like the rows of a vegetable or herb garden, pick a narrowbladed one, of course. About 6 inches wide is standard. A good hoe should not be a lightweight or wimpy tool — you mean business. Choose one with a strong, durable hardwood handle (such as hickory or ash). Forged steel is standard for the blade. If either of these parts gets worn out or damaged, replacing it is an option. As for the point of attachment, the handle should be snug and secure in a hole in the top of the blade, even reinforced with rivets, so there’s no risk of its falling off.

Sharpness counts! Your hoe will be sharp when you first bring it home. But you have to keep it so, or else it’ll do a sloppy or damaging job. File it often to maintain its beveled edge.
Hoes do a better job on ground that has recently been watered or rained upon. That’s because the weed roots they’re meant to be tearing out depart damp ground much more easily and completely than those in dry soil.

Clues to Quality Cultivating Tools


What exactly is cultivating, anyway? After all, this is gardening I’m talking about, not farming. All it really means in the context here is stirring up the soil and fighting weeds. These jobs, quite honestly, always seem to go hand in hand. You need to do them for the good of the soil and the survival and prosperity of your garden plants. Cultivating tools exist to make the job easier and more efficient, regardless of whether you’re tending a vegetable garden or a flowerbed.

Removing whatever is growing in a spot (whether weeds or wild plants or old lawn, or whatever) creates open ground — which, like a good gardener, you should improve prior to planting. So you do everything you’re supposed to do, and then what happens? A crust forms. Water may puddle and seedlings may strain to poke through. You need to gently break it up, and that’s where cultivating tools come in.
Weeds love freshly cleared ground. They’re fast; they’re aggressive. They creep in, or birds and other animals deliver them. Seeds that had been slumbering below the surface now have the light, warmth, and moisture they need to sprout. However they arrive, weeds elbow out the plants you want and hog all the resources to boot. What to do? Mulch if you can and cultivate!

Taking care of your things: Garden tool maintenance


Use those skills you picked up in kindergarten —make sure you pick up after yourself and clean up your things! Keep your tools out of the weather, no matter what they’re made of, and bring them indoors after use. Otherwise, dampness causes wood to rot, and exposure to sunlight breaks down plastic parts. Plus you don’t want anyone running over them on foot or with a bicycle or vehicle — for their safety as well as the good of the tool itself. And make sure you store sharp objects away from where kids or pets can get to them.
Keep tools clean. They’re always going to have some dirt, soil, or other material adhering to their blades after a project, but take the time to hose or wipe it off — this simple step really, really prolongs a digging tool’s life. Just make sure the tool is dry before storing, because many tools are made of high carbon steel, which rusts easily if not coated in rust-resistant material.